Tuesday, August 27, 2019

MACRO PHOTOGRAPHY

Macro Photography 


A macro photograph is one in which the size of the subject on the negative or image sensor is life size or greater, although most of the time we will end up looking at a large size image of a really small insect or flower, for example.


Technique 

Most camera manufactures sell Macro lens which allow photographers to expand the image to greater than 1:1… these lens’ are quite expensive, alternatively learners can use the camera in macro mode if available (this may not be as effective as a dedicated lens)

- Use point of focus OR manual focus

Use A TRIPOD to frame the object and background, apply compositional rules where possible

- Experiment with depth of field, you will be very close to your subject which results in a sudden drop off on focus, to overcome this you might want to maximise your depth of field therefore shoot at f 16 f22.b In other circumstances you may like the drop off in focus in which case use a lower f stop e.g. 4.0

- Work with a low/medium ISO from 100 to 400

-Apply manual exposure and the exposure meter to ensure that the subject is adequately exposed.

-In some case you may choose to use flash light


Task:
·         In the Bedroom I used the Canon camera set up on a tripod with a macro lens to shoot the image below. I had then started off with the shutter speed set to 1/100 and changed the f stop each time from F5.6- F16. I found that when the aperture was F16 he quality of the fine details in the picture claim out clearer. 


     Contact sheet:


        EDITS: 


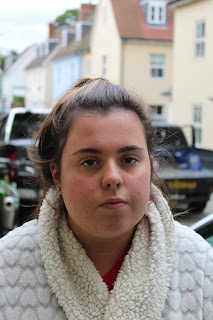
    Before - 


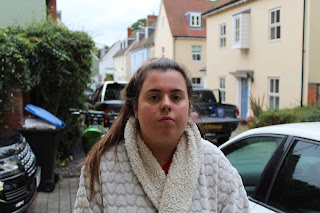
   After -


For the edited image I adjusted the vibrance and exposure. I then also used curves to highlight her pupil and iris to make the eye look brighter and more defined. I also brightened the picture and slightly increased the contrast. 


WIDE ANGLE AND TELEPHOTO


Wide Angle and Telephoto


      Definition of the technique:
Wide angle lenses (short focal length) capture more because they have a wider picture angle.
Telephoto lenses (long focal length) have a narrower picture angle.
In photography and cinematography, a wide-angle lens refers to a lens whose focal length is substantially smaller than the focal length of a normal lens for a given film plane


Focal Length
       Lens Type
Common Subjects      
       8mm - 24mm
      Ultra wide angle (fisheye)
      Wide panoramas and skyscapes, artistic
       24mm - 35mm
      Wide angle
      Interiors, architecture, landscapes
      35mm - 85mm (50mm common)       
      Standard
      General purpose
      85mm - 135mm
      Short telephoto
      Portraits, candid
      135mm - 300mm
      Medium telephoto
      Close sports, action
      300mm+
      Super telephoto
      Far sports, wildlife, nature, astronomy


      An image Bank which illustrates the technique


Typical focal lengths and their 35mm format designations:
<20mm =  Super wide angle
24mm-35mm = wide angle
50mm= normal
80mm-300mm = Tele
>300mm = super Tele


How the images were produced:


We set the location for the model to stand and then set the settings to:

zoom: 18mm 
shutter:1/1250
f stop: 3.5
ISO 200 
we then moved further and further back keeping the settings to show the wide angle/ fishbowl effect.


The images:


In your techniques evaluation, you will need to record:
·         Equipment used
·         Camera Settings
·         You will also need to evaluate how the camera settings affected the photograph.


SEQUENCING

Sequencing 


Techniques e.g. “wide angle close up technique” (create labels: techniques, Sequencing technique).

  Definition of the technique

By definition, a sequence is a serial arrangement in which things follow in logical order or a recurrent pattern. Photo sequencing is actually stitching multiple images together and it is a form of time-lapse photography. A change in an object’s position over time is being displayed and it only works when the object moves across a static background.

 An image which illustrates the technique


Equipment and settings 

1.Tripod
2.Fast shutter speed
3.Manual camera settings (to fix the exposure)
4.Manual focus
5.No Camera shake (be careful when pressing the button).
6.Direct the shoot (composition/framing and where the moving elements will move from and to are important.
7.Photo-editing software 


To create a photosequence, you will need to follow the set procedure.

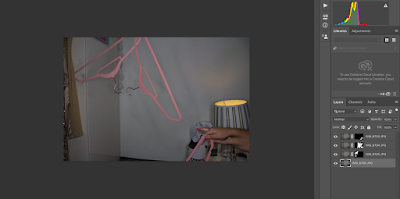
1.      Open the selected files (it is recommended that you have between four and 5 images with a clear separation of subject (that is moving) so that there are no overlaps.
2.      Ensure that the background does not move as this will make the compositing task more difficult, you were asked to use a tripod
3.      Copy the second image that you want to add to the initial background image by using the key commands (Ctrl+ C) and then paste (Ctrl+V) the image onto the background  image.    
4.      Repeat the procedure for the third, fourth and fifth file.
5.      Create a layer mask
6.      For each layer fill the layer mask in black
7.      Use the Brush tool B and paint using white with the opacity and fill for the brush set to 100%
8.      Paint one each of the masked layers (in white to reveal the moving object)
9.      Once all of the layers are painted you will have a sequence.


The equipment I used to create a sequence included a tripod a Canon DLSR and the use of photoshop. I took the a few different shots of a sequence until I got one I was happy with. I then took my two favourite sequences to then edit in photoshop. This was done by creating a layer mask for each image and then using the pen tool to draw in the object of the sequence. I repeated this until the final image was produced. Next time I would improve my image by trying to use other objects and creating more frames for a longer sequence.

Progression -

I don't think I will use this technique in my investigation as I don't think it links in well to what I intend to investigate. However I may experiment with a shoot and see what the outcome is like.


PERSONAL INVESTIGATION BRIEF

Personal Investigation brief.

Year two of A Level AQA Art and design subjects require students to develop their work in a way that they can explore their own themes.  To enable you to do this we have devised a series of advanced techniques and approaches to prepare you to conduct their own personal project.    Please be aware that the project is an investigation (it means you are trying to find something out) as such your work and approach will develop over a period of time, you must be prepared to work in an experimental and evaluative manner to be successful.

In summary below is the two components you will be expected to complete for year 2.


Please find attached a summarised copy of the specification.

Component details
Component 1 Personal investigation
This is a practical investigation supported by written material.
Students are required to conduct a practical investigation, into an idea, issue, concept or theme, supported by written material. The focus of the investigation must be identified independently by the student and must lead to a finished outcome or a series of related finished outcomes.
The investigation should be a coherent, in-depth study that demonstrates the student’s ability to construct and develop a sustained line of reasoning from an initial starting point to a final realisation.
The investigation must show clear development from initial intentions to the final outcome or outcomes. It must include evidence of the student’s ability to research and develop ideas and relate their work in meaningful ways to relevant critical/contextual materials.
The investigation must be informed by an aspect of contemporary or past practice of artists, photographers, designers or craftspeople.
The written material must confirm understanding of creative decisions, providing evidence of all four assessment objectives by:
·         clarifying the focus of the investigation
·         demonstrating critical understanding of contextual and other sources
·         substantiating decisions leading to the development and refinement of ideas
·         recording ideas, observations and insights relevant to intentions by reflecting critically on practical work
·         making meaningful connections between, visual, written and other elements.
The written material must:
·         be a coherent and logically structured extended response of between 2000 and 3000 words of continuous prose.
·         include specialist vocabulary appropriate to the subject matter
·         include a bibliography that, identifies contextual references from sources such as: books, journals, websites, through studies of others’ work made during a residency, or on a site, museum or gallery visit
·         be legible with accurate use of spelling, punctuation and grammar so that meaning is clear. Annotation must not be included in the word count for the written material.
Students can present the written material in the form of an ILLUSTRATIVE ESSAY..
The personal investigation will be assessed as a whole. Evidence of meeting the requirements of all four assessment objectives must be provided in both the practical and written material in the form of a Blogger.
4.2 Assessment objectives
Assessment objectives (AOs) are set by Ofqual and are the same across all AS and A-level Art and Design specifications and all exam boards.
The assessments will measure how students have achieved the following assessment objectives:
  • AO1: Develop ideas through sustained and focused investigations informed by contextual and other sources, demonstrating analytical and critical understanding.
  • AO2: Explore and select appropriate resources, media, materials, techniques and processes, reviewing and refining ideas as work develops.
  • AO3: Record ideas, observations and insights relevant to intentions, reflecting critically on work and progress.
  • AO4: Present a personal and meaningful response that realises intentions and, where appropriate, makes connections between visual and other elements.

Monday, August 26, 2019

ILLUSTRATED PROJECT PROPOSAL


Monday, 20 July 2015

Illustrated Project Proposal


My Personal investigation is:  to create a visual record of "Landscapes from my Adventures". This investigation will include exploring the theme of Travel taking pictures of urban, rural and other environments. I will explore locations mostly in the UK but also exploring other countries that have been accessible to me. 

Background: I decided that I wanted to focus on exploring landscape photography, this could vary from street photography to pictures of the countryside and then in exotic places too. This idea was inspired by travel and looking through many images from magazines, brochures. I plan to venture across too many different locations, including London, Harlow, Bishops Stortford, Solihull, Worcester, Birmingham, Zakynthos, Edinburgh  and any other places I can manage to get to in the time I have. 

I'd like to begin by shooting shots of locations that show just the area and surroundings rather than focusing on a certain person within a place or situations. My idea is to then elaborate further into recording 1 or a group of people in a setting. This means that I do not have to rely on models to take photos and it will be easier to gain a to more photos in the spare time I have available. 

Photographers research:
I have researched different styles of landscape and street photography, and have found familiar photographers some which I have studied before but others that, are well known but new to me as photographers such as Henri Cartier-Bresson, Lee Friedlander, Franco Fontana and Garry Winogrand. Most of these photographers shot in the era where cameras weren't as good as they are now and coloured images had not be discovered which is seen in the  from the people within in the photographs and the fact that the phots are mostly in black and white.
 I plan to approach this project by shooting from various perspectives. including architectural, monumental and then other factors like the rural countryside


The first photo is by Franco Fontana. I really liked this landscape photo because he has taken a simple image of a field and used editing technology to really enhance the saturation and make the image abstract. It reminds me of the artists work Pablo Picasso and it inspires me to experiment with editing my photos. 


The next photo is by Thomas Heaton who is a travel photographer. I liked this image as it shows the cool tones mixing with the warm tones and I like how clear the fog looks in the photo. I like the backdrop of the mountain ranges and will look at my photos around this. 


My last and final photo is by Lee Friedlander. He is a much older photographer from a different era hence why many of his photos have a contrast of black and white. I like the way he has explored architectural features within his photography and I plan to look at buildings within landscape photography and convert them into black and white. 


Techniques

The techniques I intend to explore as part of the project are Black and white, colour saturation and abstract images whilst using computer experimentation
Monday, 20 July 2


FINAL EVALUATION

Final Evaluation  When I was selecting the images for my Final portfolio I found that I included a range of photos from different shoot...